
How to Prepare a Ductless Mini Split for Winter in Mild Climates


Is Your Ductless System Ready for the Damp Winter Ahead?
Are you wondering how to prepare ductless mini split for winter operation, or is your equipment still running in its summer cooling configuration? When mid-fall (October) arrives, many homeowners switch their thermostats from cool to heat without giving the physical equipment a second thought. However, transitioning a heat pump requires more than just pushing a button on a remote. The shift from handling dry summer heat to operating in damp, foggy autumn conditions places an entirely different mechanical stress on the system's components.
The primary challenge during this seasonal transition is knowing exactly which tasks are safe for a homeowner to tackle and which require specialized training. Preparing the system for damp autumns involves clearing exterior obstructions and ensuring proper indoor airflow, but it should never cross into dangerous DIY electrical or refrigerant work. Taking care of the safe, accessible maintenance steps now ensures the equipment operates at peak efficiency before the heavy valley fog and lower temperatures set in.
To ensure your equipment is ready for the seasonal shift, combining safe homeowner preparation of your ductless mini-split systems with professional ductless maintenance is the most effective strategy.
Why Mild-Climate Winter Prep Differs from Deep-Freeze Winterization
Generic internet advice for winterizing heat pumps often focuses on heavy snow accumulation, freezing rain, and sub-zero temperatures. In regions that experience deep freezes, homeowners are frequently advised to build snow shelters or install specialized wind baffles. However, applying these deep-freeze strategies in Woodland CA can actually cause severe damage to your system. The threats in a mild climate are entirely different, driven primarily by high humidity, ambient dampness, and dense Tule fog.
In the Sacramento Valley, heat pumps rarely have to fight their way out of a snowbank. Instead, they must extract ambient heat from heavy, moisture-laden air. When operating in heating mode, the outdoor condenser coil becomes extremely cold—often dropping below the ambient air temperature to absorb heat energy. When the thick valley fog rolls in, that heavy moisture comes into direct contact with the freezing outdoor coil, leading to rapid frost accumulation. Understanding how heat pumps perform in our local climate means recognizing that humidity management is just as important as temperature control.
Because dampness is the primary adversary, one of the worst mistakes a homeowner can make is completely covering the outdoor unit with a tarp or a generic "winter cover." While this might seem like a logical way to protect the equipment from autumn rain, it actually traps ground moisture inside the casing. A covered unit in a damp climate becomes a breeding ground for rust, corrosion on the electrical contacts, and biological growth on the condenser fins. Heat pumps are engineered to withstand rain and direct exposure to the elements; they need open, unrestricted airflow to remain dry when not actively running.
Safe Mid-Fall Checklist for Homeowners
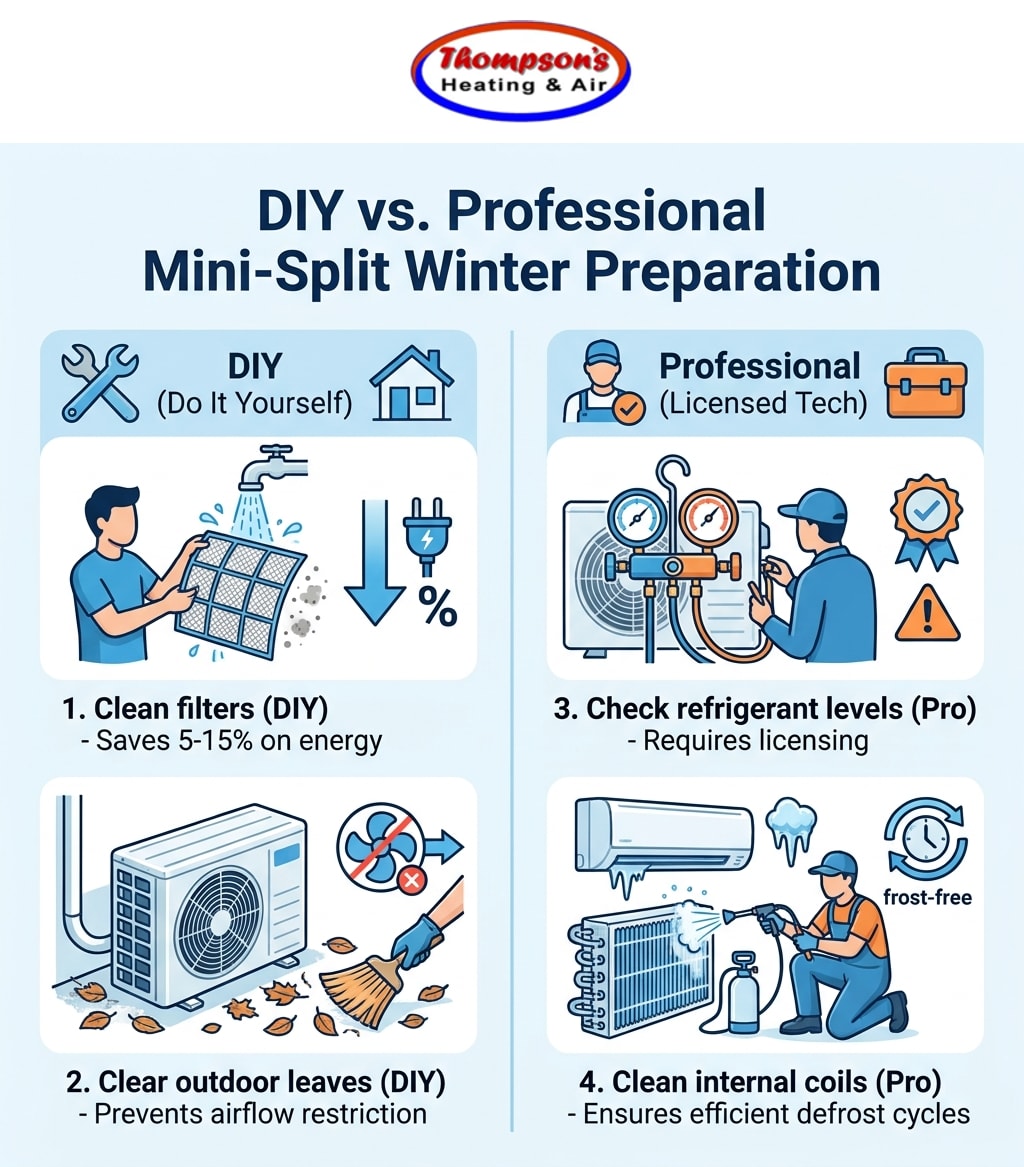
By mid-fall (October), there is a brief window of opportunity to optimize your system before the heavier heating demands begin. While internal mechanical work is strictly for licensed technicians, there are several highly impactful steps homeowners can take to improve efficiency and protect the equipment.
According to the U.S. Department of Energy, routinely cleaning or replacing HVAC filters can lower a system's energy consumption by 5% to 15%. When airflow is restricted, the blower motor works harder, and the heat exchange process slows down, driving up utility costs. Here is a safe, effective checklist for preparing your system.
Cleaning the Indoor Air Filters
Unlike traditional ducted systems that use disposable paper filters, most ductless indoor air handlers utilize reusable, washable mesh filters. These must be completely clean before transitioning to heating mode.
1. Power down the unit: Always turn off the system at the remote and the breaker before opening the front panel of the indoor air handler.
2. Remove the filters carefully: Open the front grille. The mesh filters usually slide out easily along their guided tracks.
3. Wash with mild soap: Rinse the filters under lukewarm water. If there is heavy dust buildup from the summer, use a drop of mild dish soap. Never use harsh chemicals or stiff scrub brushes, which can tear the delicate mesh.
4. Dry completely: This is a critical step. Shake off the excess water and let the filters air-dry completely in a shaded spot. Reinstalling damp filters can introduce unwanted moisture into the indoor coil, leading to musty odors when the heat turns on.
5. Wipe the louvers: While the filters are drying, use a dry microfiber cloth to wipe away any dust resting on the directional louvers and the exterior casing of the indoor unit.
Clearing Autumn Debris from the Outdoor Condenser
The outdoor unit requires massive amounts of unobstructed air to extract heat effectively. Before November temperature drops hit, clearing fall foliage is a mandatory step.
• Establish a clearance zone: Ensure there is a minimum of 24 inches of clear space on all sides of the outdoor condenser. Trim back any bushes or overgrown vegetation that encroached on the unit over the summer.
• Remove leaf buildup: Carefully remove dry leaves, twigs, and grass clippings from the base of the unit. Pay special attention to the space between the unit and the exterior wall of the house, where windblown debris tends to accumulate.
• Inspect the coil fins: Look at the delicate aluminum fins on the back and sides of the unit. If they are blanketed in dust or cottonwood seeds, use a soft-bristle brush or a shop vacuum with a brush attachment to gently pull the debris away. Always brush vertically (up and down) in the direction of the fins to avoid bending them.
• Check the line set insulation: Perform a visual inspection of the black foam insulation wrapping the copper pipes that connect the indoor and outdoor units. If the insulation is dry-rotted, torn, or missing, make a note to have a professional replace it, as bare pipes lose significant heat energy to the cold outdoor air.
Understanding Defrost Mode in Damp Winter Weather
One of the most common reasons homeowners believe their system is malfunctioning during the winter is a misunderstanding of the defrost cycle. In Woodland CA, the combination of mild winter lows (typically in the upper 30s to low 40s) and high humidity creates the exact environmental conditions that trigger frequent defrosting.
When the outdoor temperature drops and the air is heavy with moisture, the cold outdoor coil will naturally accumulate a layer of frost. If this frost is allowed to build up into solid ice, it acts as an insulator, completely blocking airflow and stopping the heat transfer process. To protect itself and maintain efficiency, the system will automatically initiate a defrost cycle.
What happens during a defrost cycle:
• The reversing valve shifts: The system temporarily switches back into cooling mode. This takes the warm refrigerant from inside the house and sends it to the outdoor coil to melt the accumulated frost.
• The indoor fan stops: To prevent blowing cold air directly into your living space, the indoor air handler will temporarily stop its blower fan, or run it at an ultra-low, unnoticeable speed.
• The outdoor fan stops: The outdoor fan turns off to allow the coil to heat up rapidly and melt the ice.
• Steam may appear: As the frost melts off the hot outdoor coil in cold ambient air, it is completely normal to see a plume of steam rising from the outdoor unit. This is water vapor, not smoke.
A typical defrost cycle lasts between 5 and 15 minutes. Once the outdoor coil sensor detects that the frost has melted, the reversing valve shifts back, and the system resumes blowing warm air indoors. If you notice the system entering this mode, do not turn it off at the thermostat. Interrupting the cycle prevents the ice from fully melting, which can cause the system to freeze over entirely on the next run.
Recognizing the Boundary Between DIY and Professional Maintenance
While clearing leaves and washing filters in mid-fall (October) are excellent ways to support your system, ductless mini-splits are complex, high-voltage machines utilizing pressurized chemical refrigerants. Crossing the line from safe exterior cleaning into mechanical troubleshooting poses severe safety risks and can instantly void manufacturer warranties.
Knowing exactly where to draw the line protects both your home and your equipment. The table below outlines the distinct boundaries between homeowner preparation and professional heat pump maintenance.
• Air Filter Management — Safe for Homeowners (DIY): Removing, washing, drying, and reinstalling the reusable indoor mesh filters. — Requires Licensed Professional: Deep-cleaning the internal blower wheel if dust has bypassed the filters.
• Debris Removal — Safe for Homeowners (DIY): Clearing leaves, twigs, and loose dirt from a 2-foot radius around the outdoor casing. — Requires Licensed Professional: Opening the outdoor cabinet to remove debris packed around internal fan motors.
• Coil Cleaning — Safe for Homeowners (DIY): Lightly brushing the exterior of the outdoor fins with a soft-bristle attachment. — Requires Licensed Professional: Applying chemical coil cleaners to dissolve baked-on grime on indoor/outdoor coils.
• Refrigerant Levels — Safe for Homeowners (DIY): Not applicable. Homeowners should never attempt to handle or measure refrigerant. — Requires Licensed Professional: Connecting specialized gauges to measure subcooling, superheat, and system pressure.
• Electrical Components — Safe for Homeowners (DIY): Flipping the breaker to safely power down the unit before washing filters. — Requires Licensed Professional: Testing capacitors, measuring amp draws on the compressor, and tightening high-voltage lugs.
Because the local climate presents unique challenges, utilizing specialized maintenance plans designed specifically to handle valley weather patterns ensures peak winter performance. A licensed technician will verify that the defrost sensors are calibrated correctly for high-humidity environments, ensuring the system doesn't ice up when the heavy fogs roll in.
Frequently Asked Questions About Winterizing Your Mini Split
How do you winterize a ductless heat pump?
To winterize a ductless heat pump, you should clean the indoor filters, clear all outdoor debris, and schedule a professional inspection. Start by washing and completely drying the indoor reusable mesh filters to ensure maximum airflow. Outside, remove any fallen leaves, twigs, or overgrown vegetation within two feet of the condenser unit. Finally, have a licensed technician verify the system's refrigerant charge and test the electrical components, as these steps guarantee the system is ready to handle the demands of continuous heating.
Do I need to cover my mini split in winter?
No, you should never cover your mini split in winter, as covering the unit traps moisture and can cause severe rust and corrosion. Heat pumps are specifically engineered to withstand rain, wind, and outdoor elements without needing a protective tarp. In damp climates like Woodland CA, wrapping the unit prevents natural airflow from drying out the internal components, which encourages biological growth and damages the electrical contacts. The best protection is keeping the area around the unit completely clear of debris.
Why is my mini split in defrost mode?
Your mini split is in defrost mode because it is actively melting accumulated frost from the outdoor coil, which is a common function during damp, 30-40 degree weather. When the outdoor unit absorbs heat from cold, humid air, moisture naturally freezes onto the cold metal fins. The system temporarily stops blowing warm air indoors and redirects hot refrigerant outside to melt this ice. This is a normal, self-protective cycle that usually lasts between 5 and 15 minutes, after which normal heating will resume.
Should I leave my mini split on all winter?
Yes, maintaining a consistent temperature is more efficient than constantly turning the unit on and off throughout the day. Ductless systems utilize inverter-driven compressors that are designed to run continuously at very low speeds to maintain a steady indoor climate. By leaving the system on and setting a comfortable baseline temperature, the equipment uses far less electricity than it would if it had to power up at maximum capacity to recover from deep temperature drops in a freezing house.
Can autumn leaf debris permanently damage the outdoor unit?
If left uncleared, leaf debris can restrict airflow, forcing the system to work harder and potentially leading to premature wear on the compressor and fan motor. When leaves block the condenser fins, the system cannot efficiently absorb heat from the outside air, causing longer run times and higher utility bills. Additionally, decaying wet leaves trapped against the metal casing can promote rust and corrosion over time. Clearing this debris in the fall prevents unnecessary strain on the equipment.
Ensure Reliable Heating Before the Winter Chill Sets In
Successfully transitioning your ductless system requires a balance between proactive homeowner care and expert technical oversight. By taking the time in mid-fall (October) to wash your filters and clear away autumn yard debris, you set the stage for optimal airflow. However, a well-maintained system that provides reliable, efficient heating all winter long ultimately relies on precise refrigerant levels and clean internal coils. Schedule your seasonal check-up before the cold weather fully arrives to ensure your equipment is completely prepared for the damp months ahead.